- B590F284207F859E6F7B7CE82A0B6006

Friday, April 30, 2021

Smart door bell!!!

The latest and greatest is smart door bells with cameras. But what if you have other doors that people use to enter your house. I have two other doors that people come use to enter our house. They were not wired for door bells. So if I am in the other part of the house I may not hear them. 

With Home Assistant and a few other components that you may already have, you can have a smart door bell system. This is a cheap solution and there are a lot of options you can use for the "doorbell" button.

I decided that since I have a RF bridge already setup with Tasmota that I would use it as what would initiate the actions of my house and the automation system. Check  My blog post about RF bridge

I love RF devices and since I had all the infrastructure present, and the RF door bells were cheap, it was the route to go. This is the one I got: RF doorbell. They were only $7 us. They also have a tamper switch on the back which is nice.

The first step was to integrate them into HA. Now there are two methods that I found to work. This is all assuming, that you have some RF sniffer: Sonoff RF bridge or what ever. The setup for the physical device is easy open it up and activate it.


The highlighted line is what you get if bridge receives a code. The "13FC0E", is what you need. It is the RF key that the device sends.

So there is two ways that I know to amke this work and it did work for me.

1) Make an "ENTITY" in home assistant to see its state changes and use that for automations:

here is the yaml :

  - platform: mqtt

    state_topic: "tele/RF_Bridge/RESULT"

    name: 'Driveway doorbell'

    value_template: '{{value_json.RfReceived.Data}}'

    payload_on: '13FC0E'

    payload_off: '13FC0Eoff'

    qos: 1

The "payload_on" is that code you got. This button only gives you one code when the button is activated. So for the payload off just put off after the same number. It creates a a binary sensor that reads the state as on or off.

Now I use Node Red for all my automations so here the flow that I use to get the code and send an alert.


Its a pretty basic flow but the main components you need are the node in the yellow box and the red box

The node in yellow is the mqtt node you get the codes from:
The info you get from the console on the RF bridge:

The first piece of info is the state topic and the second highlighted info is the "code you need". That feeds into the switch node, the node circled in red. Now, you have to change the switch entry to "contains" or it will NOT work.


When the RF bridge gets the codes that your device sends, it will feed into the switch node, check it against the codes you gave it, and pass it on. You can then have it do what ever. I have it send Alexa TTS messages about the doorbell or what ever. If you want more info on Alexa TTS read my post on how I setup up my Alexa TTS.

I was pretty happy about how well this worked. For less than $20 I was able to get a cheap doorbell/button that I can automate and do all kinds of things.

Here is the code for my node red flow for this project. It has been scrubbed of my settings. You may not need everything in it or you may use it all. But feel free to share.


Friday, March 26, 2021

Wyze Watch!!!

So prior to getting entangled into Home Assistant and getting devices out of the cloud, I was a Wyze fan boy. They have cheap but good products. I still have the first camera I bought from them and it is still working. Flash forward to now. They have scales, thermometers, sensors, a vacuum and a watch. When I got notified that they had a preorder for the watch I jumped in. I paid for this watch and am not sponsored in anyway.


It came in a small box and in the picture below all that came with it was a quick start guide, the watch and a usb charging cable. I was surprised that was all that came in the box but I guess that all you need. The charging cable is just that a cable. It is a proprietary plug so you have to use their cable. Its not a docking station or anything fancy just a cable. Here is the back of the watch the bottom is where the charger attached and in the center is the sensors for heart rate and spo2


Size compared to my old Fitbit charge is about the same. The outer case of it feels like a brushed aluminum. The screen is soft to the touch and it comes in two sizes, 47 mm and 44mm. I got the larger size but in comparison to my old fit bit it wasn't much bigger. In the picture below the screen is more of a rectangle and the longer end is situated along the band.

It came with just a standard band that feels like rubber which is about the same the Fitbit came with. 

The watch has only one button and it is on the right side of the screen which if you were it on your left wrist, it will be close to your hand. The touch screen is sharp and very responsive. The colors are bright and the menus transition pretty fast.


This is stock without any added feature. 

They claim that the battery life is supposed last for 9 days. But I have only had it for a day and the battery meter hasn't moved. 

In terms of smart home integration. I was able to use an actionable notification from Home Assistant on the watch and it worked like it was supposed to. I have some Wyze cams and they integrate seamlessly. I also tested some first generation motion and door sensors and they send and alert almost immediately.

So usually people have a bunch of pros and cons about things. But the only thing that I found that is kind of a pain, is I get some double notifications. It happens only with certain apps. But all other ones from my phone pop up on the watch. I have a Pixel phone so I can't speak about Apple.

I only paid $19.95 for it as a preorder special. As of writing this the phone app said they were sold out. I am greatly impressed with this watch. My Fitbit new was over $100. This watch preforms better, has a better screen resolution and has more features that the Fitbit for a quarter of the price.

My only gripe is were the only button on the watch is located. If you wear the watch on your left arm the button is on the inside toward hour hand. 


So if you happen to bend your arm/wrist too much you activate the button. But that is the only thing I have found so far that is an annoyance. I will probably change the band when more are available as these rubber ones tend to hold sweat.

So there is my two cents about the new Wyze watch. You can't beat that price and I will post on twitter about anything new that they come out with. 


Saturday, September 12, 2020

Case#1: Decreasing wife approval points aka light switches not working

This is the start of a series of posts were I will fix things that are broken, or break in my house.

CASE#1

Of course when I go to shift for 24 hours things break. I get the dreaded text message. "Your light switches you HAD to change aren't working." So the first thing with a message like that I always question if she is truly meaning plural light switches. I text her back: "what switches aren't working". My worst fear, there were six not working. Now I had not changed crap for three days in HA so.......

So the majority of my light switches are flashed Wifi switches, well all but one. I have an addiction. I have a couple of brands of smart switches. The the main ones that I use are Aoycocr SW1. I flashed them over the air with Tasmota. They WERE working fine up until two days ago when she tried to turn on the light.

FIX #1

Push the button a bunch of times....the old hit it with a hammer method!


Of course it didn't work. If it did there wouldn't be a post about it.

FIX #2

So frustrated I went to the forums and looked for a similar problem. No go, nothing I could find. I posted to Dr. Zzs group and got this response :


SetOption73Enable Buttons decoupling and send multi-press and hold MQTT messages
0 = disable decoupling (default)
1 = enable decoupling

In the command line it was set to 0 so I set it 1 and then back to 0 to see if there was something weird with it. Yea no go. Still no response with the physical portion of the switch.

FIX #3

So being the troubleshooter I am I went and turned off the breaker and opened the box. All the wires were intact. I mean the light on the switch was on. But in the many years I have done electrical contracting, even the most seasoned installer, can have wires come loose from a device, it just happens. Nope all good.

FIX#4

So after being continually frustrated. I decided to change the module to generic and reboot the device.


I then put it back to the correct module again. Still no go.


FIX#5


Upgrade the firmware:


Still nothing. I was definitely thinking it had to be something to with Tasmota, the template, or something with the rules. I don't think it has anything to do with the switch at all.

FIX#6


I entered Reset 6 essentially put it back to the state it was when it was just flashed as a Sonoff Basic Module.


I put back in the template that I used before when it was working:

{"NAME":"Aoycocr SW1","GPIO":[158,255,57,255,255,255,255,255,56,17,255,21,255],"FLAG":15,"BASE":18}

WE HAVE LIFT OFF.


Credit for this goes to Paul Barrett in Dr Zzs Facebook group. With all the negativity in the world it's nice to have people helping others still. Now to fix the six other ones that are messed up before I have to sleep on the coach, AGAIN.


Thursday, September 10, 2020

NFC tags in Home Assistant the Android way


With the new update to 0.114 in Home Assistant there were alot of cool changes. One of the newest features I was anxious to test out and use for my home automations was NFC tags. Prior to this update, you had to use tasker and/or another app to get it to work. Well that is no more.

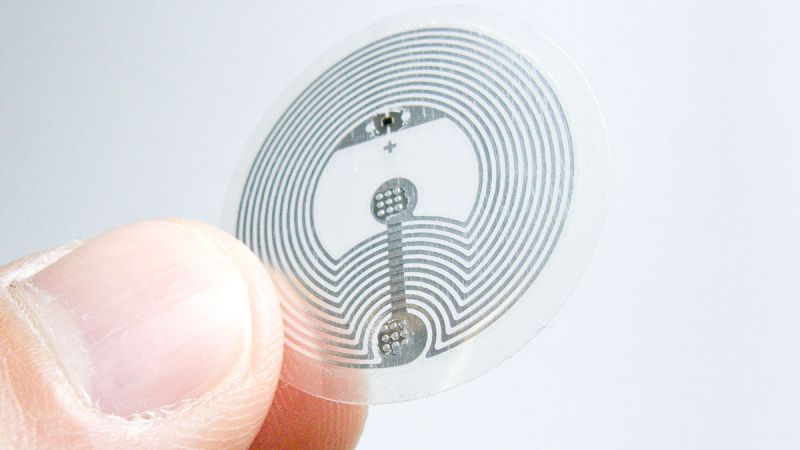
NFC (near field communication) is a wireless technology which allows for the transfer of data such as text or numbers between two NFC enabled devices. NFC tags, for example a sticker or a fob, contain small microchips with little antennas which can store a small amount of information for transfer to another NFC device, such as a mobile phone.

If you have updated mobile the app it supports reading and writing on NFC tags. According to my research, almost all mobile smart phones, within the last couple of years, can read NFC tags and almost all Android phones can read and and encode. Apple have enabled NFC tag scanning on the iPhone 7, 8 and X running iOS 11 or later with an App. The latest iPhone XS, XS Max, XR, 11, 11 Pro and SE models can scan NFC tags natively without requiring an additional App. So you have the ability to read then and even write them without you knowing.

So you are asking what the hell does this mean for home automation. Well prior to this update you had to use an other app to read the tags. Then had to use tasker to talk between your phone and home Assistant. Now if you have the HA mobile app...SCAN AWAY.

The first thing that I found was the little stickers/tags are cheap. You can buy 30 tags for $11. At that price there might be tags used for things all over the place. This opens up a lot of possibilities. Imagine having a script or Node Red flow that turns off everything at night or turns it all on again in the AM, with the tap of your phone. You don't have to say anything to a voice assistant anymore. Or push a button on a phone or tablet. Put your phone on a strategically placed tag somewhere on your nightstand, table or wherever, and boom your night routine/script is done.

The second thing I found, I have a Pixel 2/Android, I have to unlock my phone and have the screen on for it to read the tag.

This was the setup my Android phone in the Home Assistant App. Scroll down on the menu down to App Configuration


Then NFC Tags to setup a new tag


Then here you will either read or write your tag. You more that likely won't need to read your tag from here since you will just use your phone's nfc reader anyways.


In Home Assistant you have to set up an automation for it to do something.


It gives you the code you need for your automation. 


You can write you automation manually but I tried it with the UI and here is how I did it. I confirmed it worked.


You can see you need that device ID: from your phone and the tag ID also.

For my Pixel 2 I have to unlock my screen for it to read the tag. But once I touch the tag it opens up a window asking me to use the link for HA.


The automation is run and all is good!! It's not perfect...yet, but it's something cool to try.

The other thing I tested was my wife's phone. She also has the HA app installed. I touched her phone the the tag and nothing happened. So you have to have the app installed on the phone that you are using and add the tag in it also. So if someone came over and didn't have the HA app it won't work. So that's one level of security. So if the tag is tied to an automation through the mobile app it won't work.

I am working on getting a Node Red flow ready for this. But I thought that I would put this up since I found it to be something new and fun to try out.

The automation I made last night was to run a good night script where everything in my house turned off when I scanned the tag.


HAVE FUN!!!

Hit me up on FACEBOOK and Twitter and give me a follow in this blog for new material all the time.


Tuesday, September 8, 2020

Making Alexa and your echo devices work for you.


If you are like me you have Amazon devices in your house. I have 10 echos in my house. When I moved to Home Assistant I found a skill to make them work for me.

I have an Echo plus, that was the first smart home device I ever owned. I have an Echo Show  in my room. My teenage son has one, my younger kids room has an echo kids. My kitchen has one. I have a three echo Flex around the house. Plus I got in early on the Echo Auto presale.

Initially we used them exclusively for asking questions and basic automations. Then came Home Assistant. I found this skill:

https://github.com/custom-components/alexa_media_player/wiki/Configuration

Which unlocked so many options and cool things you can do. I use the skill to announce things around my house. I can setup automations to give announcements and reminders and also mess with my wife and kids. All the devices have become an "intercom" system.

If you want to see how to install them there are guides all over Youtube to show you how to use it. I even have a view in Lovelace that has a GUI to say things on the fly.

You can put your text on the "Text to speech" line and hit send and it your Alexa device will say whatever you put there.

Prior to using Node Red I used yaml to make automations for our announcements and reminders:

Just put the name of your echo device were the dashes are. In this example it will make just say the message that you put next to "Message:"

if you need to know the name of your Alexa devices go to your developers tools and and call service tab. Look for "ALexa Media Players" and it will give you the devices you have synced with HA.

Here is the node red version with announce:

{{"message":"Its Tuesday, the garbage cans need to be taken out","data":{"type":"announce"}}

This hung me up for so long until I got help with the Data part. The sky's the limit of what you can do. The only funky thing is that some words are pronounced weird. 

I also use this as a makeshift intercom system in my house. 


Using the mini media card you can put text on the text to speak line. The echo device will say what you put on that line. Hit that triangle to the right and the device will say it.

Add a manual card and paste this in:

type: 'custom:mini-media-player' artwork: full-cover entity: media_player.CHANGE_ME_TO_YOUR_DEVICE icon: 'mdi:amazon' tts: platform: alexa enity_id: media_player.CHANGE_ME_TO_YOUR_DEVICE

Check your indentation or it won't work. The lines after TTS: are the only ones indented.


As you can see the sky's the limit of what you can do with this skill. I keep finding new ways to use it. Make sure if you like the skill go to this GitHub and maybe contribute to the cause:
         https://github.com/custom-components/alexa_media_player

I will put copies of the code on the HA yaml or node red code page at the top of the blog.

Make sure you follow me on this page, or on Twitter  or FaceBook.

I post frequently so keep coming back. Comment on this page if you need help or if you have something cool to share. I will be playing with NFC tags in my next post so hit that follow button!!!